728x90
반응형
SMALL

이전의 내용에서는 1번 Config파일에서 인증을 거쳐야 하는 경로를 지정하거나 6번에서 비밀번호를 암호화하여 비밀번호 일치여부를 확인하는 과정에 대해서 배웠다!
오늘 공부해볼 내용은 3,4 과정이다.

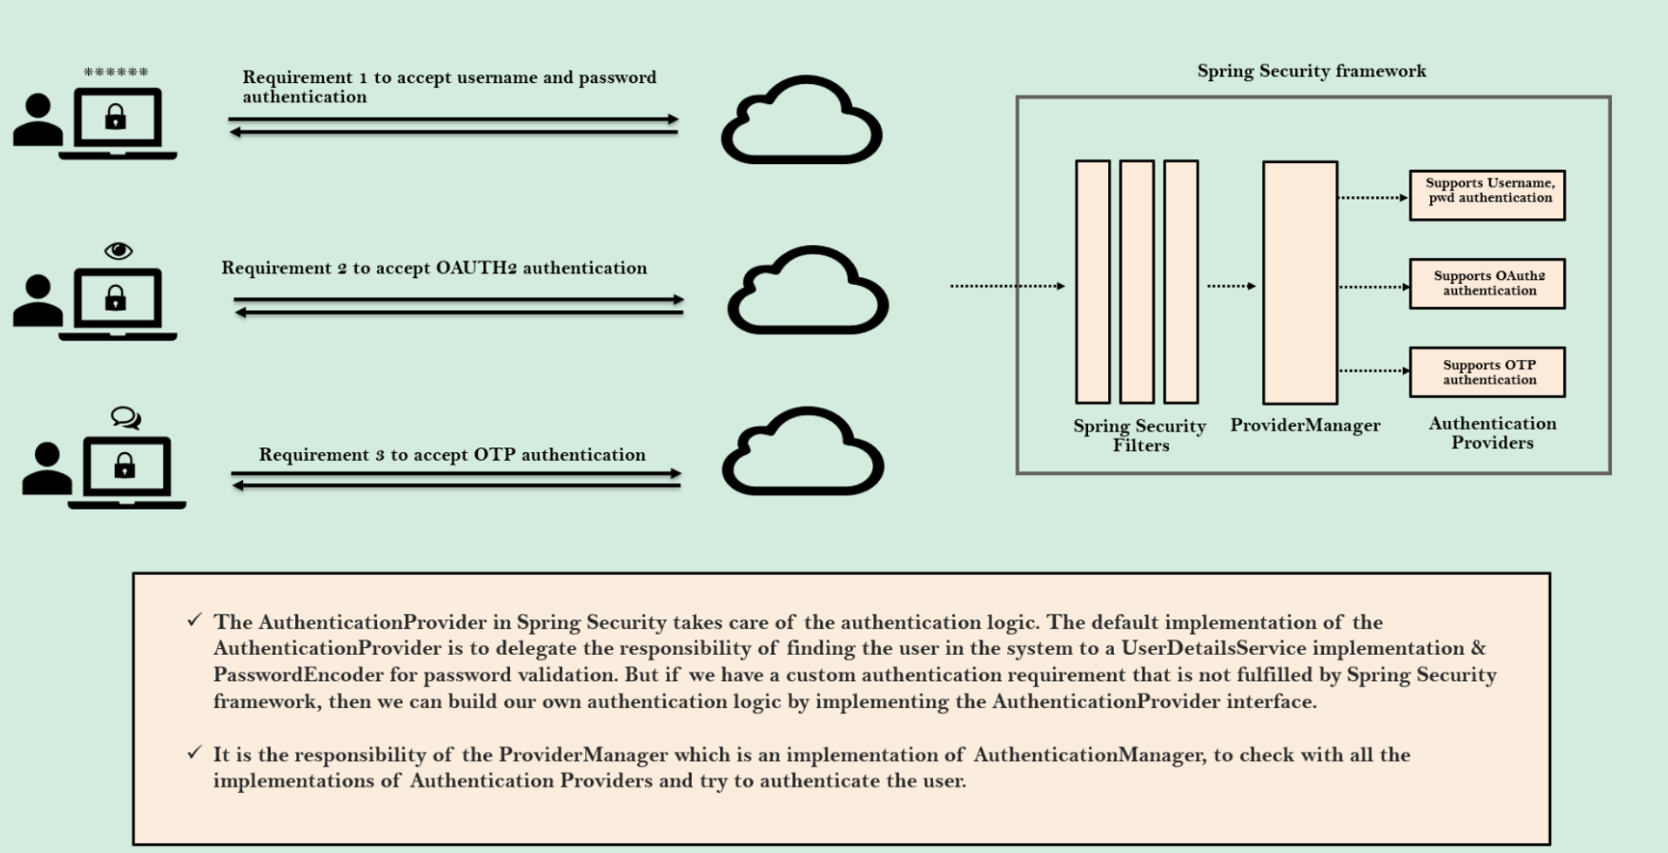
- 유저는 로그인 하기 위한 세가지 방법을 진행할 수 있다.
첫 번째, 유저의 아이디와 비밀번호로 인증 요청
두 번째, OAuth2를 인증 요청
세 번째, OTP인증 요청 - 요청은 Security Filter가 인터셉트하여 인증을 위한 ProviderManager의 authenticate 메서드를 호출한다.
- ProviderManager는 Audentication Provider를 Implement한 클래스들을 모두 호출하여 인증성공을 반환하는 클래스가 있는지 확인한다.
- 우리는 Authentication Provider를 상속받아 직접 인증절차를 로직으로 구현할 수도 있다.
ProviderManager의 Authenticate 메서드를 알아보자
@Override
	public Authentication authenticate(Authentication authentication) throws AuthenticationException {
		Class<? extends Authentication> toTest = authentication.getClass();
		AuthenticationException lastException = null;
		AuthenticationException parentException = null;
		Authentication result = null;
		Authentication parentResult = null;
		int currentPosition = 0;
		int size = this.providers.size();
        // 모든 Provider객체들을 호출하여 하나씩 검증하기 시작함
		for (AuthenticationProvider provider : getProviders()) {
			if (!provider.supports(toTest)) {
				continue;
			}
			if (logger.isTraceEnabled()) {
				logger.trace(LogMessage.format("Authenticating request with %s (%d/%d)",
						provider.getClass().getSimpleName(), ++currentPosition, size));
			}
            ...//catch


            //만약 result값이 null이아닌경우 == 성공적으로 검증이 수행된 경우
            if (result != null) {
            //Credentials(유저의 정보)을 삭제하고 성공한 Authentication값을 반환함
			if (this.eraseCredentialsAfterAuthentication && (result instanceof CredentialsContainer)) {
				// Authentication is complete. Remove credentials and other secret data
				// from authentication
				((CredentialsContainer) result).eraseCredentials();
			}
			// If the parent AuthenticationManager was attempted and successful then it
			// will publish an AuthenticationSuccessEvent
			// This check prevents a duplicate AuthenticationSuccessEvent if the parent
			// AuthenticationManager already published it
			if (parentResult == null) {
				this.eventPublisher.publishAuthenticationSuccess(result);
			}

			return result;
}- Filter에서 호출된 Authenticate는 반복문을 거쳐 AuthenticationProvider 객체들을 호출한다.
- 각 객체들은 검증을 수행하게 되고 그 중 result에 값이 성공적으로 담긴 객체가 있다면
- 유저의 Credential(기밀 정보)를 삭제하고 성공한 Authentication객체 값을 반환한다.
AuthenticatinProvider의 코드를 살펴보자
public interface AuthenticationProvider {

	/**
	 * Performs authentication with the same contract as
	 * {@link org.springframework.security.authentication.AuthenticationManager#authenticate(Authentication)}
	 * .
	 * @param authentication the authentication request object.
	 * @return a fully authenticated object including credentials. May return
	 * <code>null</code> if the <code>AuthenticationProvider</code> is unable to support
	 * authentication of the passed <code>Authentication</code> object. In such a case,
	 * the next <code>AuthenticationProvider</code> that supports the presented
	 * <code>Authentication</code> class will be tried.
	 * @throws AuthenticationException if authentication fails.
	 */
	Authentication authenticate(Authentication authentication) throws AuthenticationException;

	/**
	 * Returns <code>true</code> if this <Code>AuthenticationProvider</code> supports the
	 * indicated <Code>Authentication</code> object.
	 * <p>
	 * Returning <code>true</code> does not guarantee an
	 * <code>AuthenticationProvider</code> will be able to authenticate the presented
	 * instance of the <code>Authentication</code> class. It simply indicates it can
	 * support closer evaluation of it. An <code>AuthenticationProvider</code> can still
	 * return <code>null</code> from the {@link #authenticate(Authentication)} method to
	 * indicate another <code>AuthenticationProvider</code> should be tried.
	 * </p>
	 * <p>
	 * Selection of an <code>AuthenticationProvider</code> capable of performing
	 * authentication is conducted at runtime the <code>ProviderManager</code>.
	 * </p>
	 * @param authentication
	 * @return <code>true</code> if the implementation can more closely evaluate the
	 * <code>Authentication</code> class presented
	 */
	boolean supports(Class<?> authentication);

}- 이 클래스에도 authenticate 메서드가 존재한다.
- Authenticate()
- Spring Security 필터들에 의해 발생한 엔드 유저의 이름과 Credential이 포함된 인증 객체
- 메소드 내 모든 로직을 완성했다면 성공적인 인증 정보를 생산하고 있는지, 인증 객체를 반환값으로 작성하고 있는지확인한다
- supports
- 처리가능한 Authentication을 supports에 지정해 줄수 있다.
Security에서 기본으로 제공하는 DaoAuthentication Provider
- authenticate메서드
- 유저의 아이디와 비밀번호를 확인하는 토큰을 가져와서 인증하는 과정을 거친다.
- 여기서 중요한 점! Provider를 포함하는 UserDetails나 userServices에서 해당 로직을 생성할 수 있지만 Provider클래스에서 이를 구현한다면 UserDetailes와services는 필요없으므로 조금 더 간결하고 효율적인 코드를 생성할 수 있다.
@Override
	public Authentication authenticate(Authentication authentication) throws AuthenticationException {

//UsernamePasswordAuthenticationToken이 맞는지 확인하는 과정
Assert.isInstanceOf(UsernamePasswordAuthenticationToken.class, authentication,
				() -> this.messages.getMessage("AbstractUserDetailsAuthenticationProvider.onlySupports",
						"Only UsernamePasswordAuthenticationToken is supported"));


		try {
			this.preAuthenticationChecks.check(user);
			additionalAuthenticationChecks(user, (UsernamePasswordAuthenticationToken) authentication);
		}
		catch (AuthenticationException ex) {
			if (!cacheWasUsed) {
				throw ex;
			}
			// There was a problem, so try again after checking
			// we're using latest data (i.e. not from the cache)
			cacheWasUsed = false;
			user = retrieveUser(username, (UsernamePasswordAuthenticationToken) authentication);
			this.preAuthenticationChecks.check(user);
			additionalAuthenticationChecks(user, (UsernamePasswordAuthenticationToken) authentication);
		}
		this.postAuthenticationChecks.check(user);
		if (!cacheWasUsed) {
			this.userCache.putUserInCache(user);
		}
		Object principalToReturn = user;
		if (this.forcePrincipalAsString) {
			principalToReturn = user.getUsername();
		}
		return createSuccessAuthentication(principalToReturn, authentication, user);
	}
- support 메서드
- DaoAuthenticationProvider는 아이디와 비밀번호를 통한 검증이 이뤄지기 떄문에 supports에서 UsernamePasswordAuthenticationToken을 반환받아 사용한다.
public boolean supports(Class<?> authentication) {
		return (UsernamePasswordAuthenticationToken.class.isAssignableFrom(authentication));
	}
직접 Authentication Provider 구현해보기
- DB에서 정보를 가져와 유저가 입력한 정보와 일치여부를 확인하는 로직의 Authenticate메서드를 구현해보았다.
- passwordEncoder의 matches 메서드를 통해 유저가 입력한 pwd와 customer객체(저장소의 객체)를 비교하여 일치하는지 확인한다.
- 이때 pwd에 해싱을 수행하여 나오는 결과값과 customer의 비밀번호에 나오는 값이 일치한다면 성공이다.
- authorities에는 유저의 정보가 GrantedAuthority타입으로 들어가있다.
- 성공적으로 수행시 UsernamePasswordAuthenticationToken에 유저의 아이디,비밀번호, GrantedAuthority타입의 authorities가 담긴 객체가 생성된다.
@Component
public class EasyBankUsernamePwdAuthencationProvider implements AuthenticationProvider {

    @Autowired
    private CustomerRepository customerRepository;

    @Autowired
    private PasswordEncoder passwordEncoder;

    @Override
    public Authentication authenticate(Authentication authentication) throws AuthenticationException {
        String username = authentication.getName();
        String pwd = authentication.getCredentials().toString();
        List<Customer> customer = customerRepository.findByEmail(username);
        if (customer.size() > 0) {
            if (passwordEncoder.matches(pwd, customer.get(0).getPwd())) {

                List<GrantedAuthority> authorities = new ArrayList<>();
                authorities.add(new SimpleGrantedAuthority(customer.get(0).getRole()));
                return new UsernamePasswordAuthenticationToken(username, pwd, authorities);
            } else {
                throw new BadCredentialsException("Invalid Password");
            }
        } else {
            throw new BadCredentialsException("No user registred with details!");
        }
    }

    @Override
    public boolean supports(Class<?> authentication) {
        return (UsernamePasswordAuthenticationToken.class.isAssignableFrom(authentication));
    }
}
마지막으로 정리한 도식을 보면 아래와 같다.

다음에는 JWT토큰을 사용하기 위해 CORS와 CSRF에 대해 먼저 공부해보겠다.
728x90
반응형
SMALL
'Spring > Security6' 카테고리의 다른 글
| [Java - Spring Security6] PasswordEncoder와 BCryptPasswordEncoder, 그 이외의 암호화 클래스들 (0) | 2024.03.04 |
|---|---|
| [Java - Spring Security6] Config파일 해석 및 직접 FilterChain만들기 (1) | 2024.03.02 |
| [Java - Spring Security6] Spring Security를 사용하는 이유 및 아키텍처 (0) | 2024.02.25 |
| 자바[Java] - Security 소개 (2) | 2023.12.11 |